Selecting ROI/BB in OpenCV(Mat)
So my mid-terms got over this Monday and I had no idea whatsoever what happened in the 1 week of exams. I started working on SURF feature detector based Tracking algorithm using OpenCV python bindings and SimpleCV. I couldn’t complete it. But I have made significant amount of progress and I’ll write a post about it in few days. While wroking with this idea, I faced a lot of troubles and especially the run-time speed. I was getting less than 1 fps. It’s really irritating to see the code work so slow. Finally, I have decided to switch to C++. I tried couple of things on OpenCV C++ and was amazed to see the run-time speed that I was getting.
So, I started from scratch. First of all, I learned how to use the webcam. It was a really small code, but I was getting a lot of errors. See this gist. It turns out that I’m so much accustomed to Python, that it took me quite a while to migrate to C++. I have been working on various tracking algorithms and the first thing that comes to your mind when thinking about tracking is the bounding box. How to select the Region of Interest in the image.
I looked around on stackoverflow, google and many other websites, but the only codes that I could find were related to ROI selection in an IplImage. IplImage is really old. One simply can’t use IplImage anymore. Mat must be used. Although it wasn’t that difficult to come up with a ROI selection code for Mat, it took me quite a while and many stackoverflow questions and answers.
To select ROI and the new image, I wanted to slice the Mat. This could have been really easy in Python as numpy is really easy to slice. After few stackoverflow answers, I got a way to slice the Mat image. To slice the Mat image, I need to create a Rect.
Slice a Mat Image:
Mat img;
Rect rect;
/* Get the img from webcam or from file. Get points from mousecallback
 * or define the points
 */
rect = Rect(point1.x,point1.y,point2.x-point1.x,point2.-point1.y);
Mat roiImg;
roiImg = img(rect); /* sliced image */
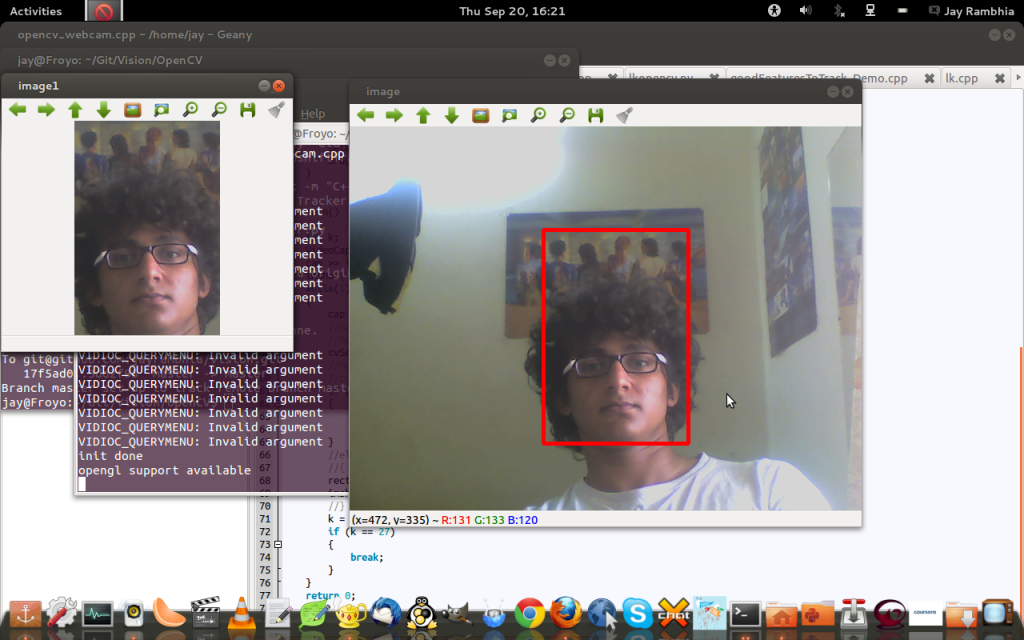
After successfully slicing the image, I made a program in which user selects the ROI/Bounding Box, and the sliced image is displayed in another window continuously(live).
Select ROI or Bounding Box: Include libraries. Define required global variables.
#include<opencv2/highgui/highgui.hpp>
using namespace cv;
using namespace std;
Point point1, point2; /* vertical points of the bounding box */
int drag = 0;
Rect rect; /* bounding box */
Mat img, roiImg; /* roiImg - the part of the image in the bounding box */
int select_flag = 0;
MouseCallback function
void mouseHandler(int event, int x, int y, int flags, void* param)
{
    if (event == CV_EVENT_LBUTTONDOWN && !drag)
    {
        /* left button clicked. ROI selection begins */
        point1 = Point(x, y);
        drag = 1;
    }

    if (event == CV_EVENT_MOUSEMOVE && drag)
    {
        /* mouse dragged. ROI being selected */
        Mat img1 = img.clone();
        point2 = Point(x, y);
        rectangle(img1, point1, point2, CV_RGB(255, 0, 0), 3, 8, 0);
        imshow("image", img1);
    }

    if (event == CV_EVENT_LBUTTONUP && drag)
    {
        point2 = Point(x, y);
        rect = Rect(point1.x,point1.y,x-point1.x,y-point1.y);
        drag = 0;
        roiImg = img(rect);
    }

    if (event == CV_EVENT_LBUTTONUP)
    {
       /* ROI selected */
        select_flag = 1;
        drag = 0;
    }
}
Main function
int main()
{
    int k;
    VideoCapture cap = VideoCapture(0); /* Start webcam */
    cap >> img; /* get image(Mat) */
    imshow("image", img);
    while(1)
    {
        cap >> img;
        cvSetMouseCallback("image", mouseHandler, NULL);
        if (select_flag == 1)
        {
            imshow("ROI", roiImg); /* show the image bounded by the box */
        }
        rectangle(img, rect, CV_RGB(255, 0, 0), 3, 8, 0);
        imshow("image", img);
        k = waitKey(10);
        if (k == 27)
        {
            break;
        }
    }
    return 0;
}
So, basically it looks something like this

I am also working on Lucas Kanade Tracker. I am porting the Python code to C++. And the fps that I’m getting is really incredible. I’ll write another post about Lucas Kanade Tracker with OpenCV C++ in few days.
P.S. Do checkout the Pink Floyd back catalogue poster in the image!
Playing around with Android UI
Articles focusing on Android UI - playing around with ViewPagers, CoordinatorLayout, meaningful motions and animations, implementing difficult customized views, etc.


